I saw this post today on Facebook, from the Raw for Beauty site. I love the infographic they used!
 Source: Raw for Beauty
Our raised bed area doesn’t look quite as picturesque – but it does the trick.
We had an area off the side of our house, that used to be a dog run and had been unused for several years. In 2012, we decided to make some raised beds. We had been composting in a corner of this rectangle area (behind the very healthy Nandinas to the right), using old pallets for the composting bin. It had been tucked away with its own area sectioned off with split rail, and some tall arborvitaes, so it was a perfect area to create a veggie garden. We started pricing raised bed materials and were amazed how costly they were. Hundreds of dollars per bed! We decided to look for other materials.
Living in coastal Delaware, we get a lot of weeds. Crabgrass and wild Bermuda grass is a serious problem. We placed landscape paper over the entire grass area and my husband began mapping out large rectangle areas for raised beds out of concrete block. (Yes concrete block, also referred to as cinderblock, cinderblock is actually a different material and much harder to find these days, many people use the term cinderblock but what they actually purchase at a big block store is concrete block.) Whatever their name they are those large, unattractive blocks I used in college to support bookshelves for my stereo and vinyl albums! Since no one is really going to see this area in our back yard, and it is well disguised from the road and neighbors, we weren’t too concerned with aesthetics. My husband started out with two beds, but quickly anted-up to five. They were easy to install, and each bed cost under $50 to construct.
 Finishing off the first concrete block bed. Under the blue tarps is firewood.
Here are the first three concrete block beds. We eventually put landscape paper all around the area. Our beds were two courses high. We did not anchor our blocks with concrete. We had quite a lot of old larger red rock and we filled some of the holes with that, some with extra soil.
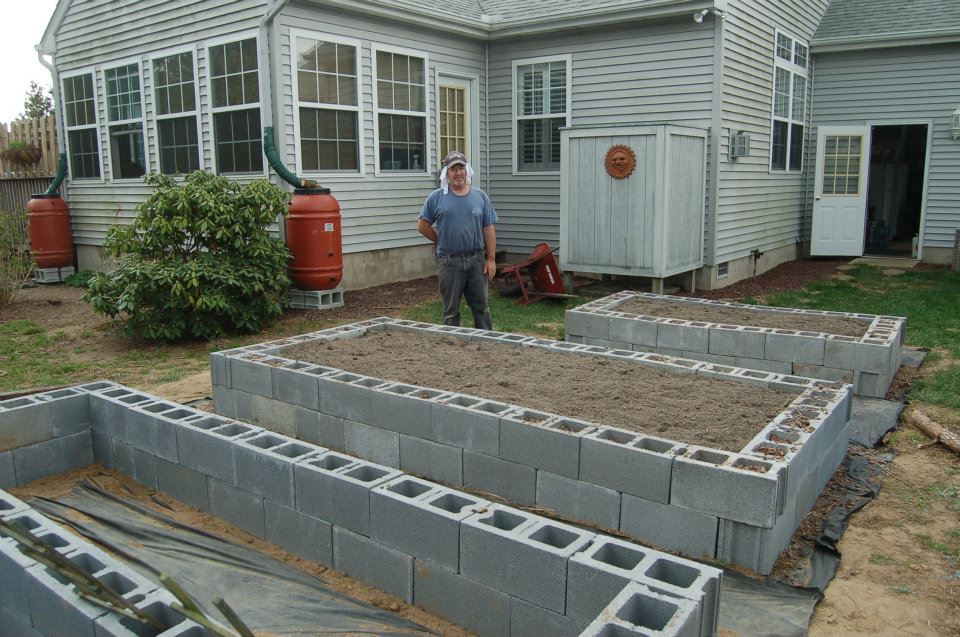 Steve stands by his concrete block project. The empty one in the foreground became the bed where we “hilled” potatoes
We probably should have, but we did not use any drip irrigation. As you can see we have two rain barrels, so we have water readily available. Later that summer we added two more.
 Same area with mulched and first plantings
 As you can see each bed is two blocks high, and we staggered these. Nothing else is holding them in place except for perhaps every fifth hole, we poured some loose rock and gravel.
Along a split-rail fence we added another longer, but narrow bed:
 In this photo five beds are visible. Under the blue tarps is firewood. Off to their left is a cluster of plants that disguise a compost bin made from recycled pallets. We’ve been tossing household food waste, lawn clippings, vegetation in there for years and created some beautiful black compost. We strongly believe this is what made our garden grow so well!
This was our first experiment with growing vegetables. I am not a tree-hugging, organic-only type of consumer, but I’d rather not use pesticides if I don’t have to! Our first year, we used nothing. No fertilizer, no pesticides. A few air-borne weeds landed in the mulch area. Since we have a pond and bird-friendly structures nearby, we get a lot of bird traffic and we saw many near the garden area. I think they picked the vegetables clean of any insects that might have tried to gain a foothold. We have plenty of common rabbits in the area, but none damaged our vegetables, due to the two-course high of block. Our second year has seen very little insect damage, no diseases and very good yields! Compost, compost, compost!
For our first year, we planted way too much lettuce, and we were eating salads with Romaine, Red Sail and butter crunch for quite some time. We also grew broccoli, cauliflower, yellow and green snap beans, peppers, and beets. My husband grew tomatoes in pots, but they did not do as well.
 Romaine lettuce
 Lettuce
 Broccoli
One of our more interesting projects was growing potatoes. We planted red seed potatoes in our largest bed. We had looked into “hilling” potatoes in buckets or large sacks. Once we had the bed created, we decided to try and hill them in the bed. We put only a couple of inches of soil in initially, then laid the potato sections in the bed and covered them with another two inches or so. Once the plants sprouted and got taller, we added more soil (50% compost, 50% purchased garden soil) and kept adding soil as the plants grew taller. Eventually the soil reached near the top of the second course of block. Once the leaves started to turn, that was our cue to harvest the potatoes. Hilling produces more potatoes per plant as it encourages a root system (tuber) to sprout from the plant’s nodes. We averaged around 5-6 potatoes per plant! They were delicious!
 We “hilled ” these red potatoes in a raised bed, adding soil as the plants grew!
Here is a video of my husband and his daughter harvesting the potatoes:
My plans are to stain the blocks, and I have already started growing herbs in some of the pockets provided by the block’s holes. I would love to have some creeping phlox or other annuals grow in the pockets. In 2013, we rotated the crops, and this year, we planted tomatoes directly in one of the beds and they are doing very well. We have had no issues with mildew, mold, pests, insects or disease. I attribute this to our birds, for the vegetation being raised, and my husband’s diligence tending to his crops. We’ve been invaded by sedge grass this year, which lands from the air and grows on top of the landscape paper. Fortunately it is easy to put up, but they keep coming back!
We have not had any push back on the block. They have stayed in place. At some point we might need some rebar or concrete to anchor them, but it hasn’t been an issue so far. The area primarily receives afternoon sun – at least four hours of direct sun. So far, everything seems to be the perfect combination!
Another video of my husband talking about the beds:

What is your water retention like in the beds? Does the water seep out through the spaces between the blocks? Thanks!
We never had an issue with water leaking out. Never had it happened and never thought about it! We kept this raised bed garden until 2021. I quite frankly wanted wooden beds, and the expense was something my husband didn’t want to invest in. We could have controlled that with stakes, but we or I should say I decided to turn this area into a pollinator garden which I talked about in a recent post. But the concrete blocks worked well. I think our soil was excellent and very water retentive, and the plants’ uptake was very good too. I’ve since seen concrete block beds topped off with a cedar plank, which makes them look better. That would have been a compromise. The blocks did start to shift after about 5 years and his enthusiasm for vegetable gardening waned. The area I had created for flowers evolved into a deep shade area, so I was lamenting about not having any flowers. So I took that area more than!